
How to Arrange Wall Art to Transform Your Space
Arranging wall art might seem like a simple task, but it’s often the difference between a room feeling complete or lacking. The right placement can make your artwork pop, tie together a space, and reflect your personal style. Whether you’re decorating a cozy apartment or a spacious home, the way you arrange your wall art plays a crucial role in setting the mood and tone of the room.
In this guide, we’ll take you through the basics of arranging wall art and dive into more advanced techniques that can bring your space to life. From simple tips on symmetry to creative, unexpected placements, by the end of this guide, you’ll be ready to make your walls feel as stylish as the rest of your home.
Table of Contents
Why Arranging Wall Art is More Than Just Decoration

When you think about wall art, what comes to mind? Is it just something to fill the space, or is there a deeper connection at play? Arranging wall art isn’t just about filling an empty wall—it’s about creating an atmosphere, telling a story, and even reflecting a bit of who you are. Your choice of art and how it’s arranged impacts the energy of the entire room. Done well, it can make a space feel alive, welcoming, and uniquely you.
The placement of art can also change how you perceive a room. A well-curated gallery wall can bring warmth and character to a minimalist space, while a single bold piece can turn a quiet corner into a focal point. It’s about using art to bring balance, texture, and personality into a room, tying together different design elements like color, furniture, and lighting.
More than just an aesthetic decision, wall art placement has the power to influence mood and functionality. Think about how certain art can make you feel calmer, energized, or even inspired. By carefully arranging art, you can enhance the overall vibe of your space, whether you’re aiming for a cozy sanctuary or a vibrant, high-energy living room.
The Basics of Wall Art Arrangement: Symmetry, Spacing, and More

Arranging wall art is more than just picking a spot and hoping for the best. There are a few fundamental principles that, when applied, can instantly elevate your space. If you’re just starting out or need a refresher, here are some of the key basics to keep in mind:
1. Symmetry vs. Asymmetry
One of the first decisions you’ll make is whether to go for a symmetrical arrangement or a more free-flowing, asymmetrical layout. Symmetry creates a sense of order and calm, often suited for more formal spaces like a dining room or hallway. Think of it like a visual handshake—balanced and neat. On the other hand, asymmetry brings energy and a modern flair. If you’re working with a more eclectic or casual space, leaning into asymmetry could give your art a playful vibe.
2. Eye-Level Placement
A simple rule that often gets overlooked: Hang your art at eye level. For most people, this means placing artwork roughly 57–60 inches from the floor. Of course, this can vary depending on your space or the piece itself (e.g., a towering, oversized painting will need different considerations), but aiming for this range ensures that your art feels approachable and easy to admire.
3. Proper Spacing
Spacing is where a lot of people go wrong. Too much space between pieces can make them feel disjointed, while too little can overwhelm the space and create chaos. For most pieces, leaving about 2–5 inches between them is ideal. If you’re arranging several artworks together, ensure the spacing is consistent for a harmonious look. In a gallery wall setup, a mix of different art sizes works beautifully as long as the gaps are uniform.
4. Balancing Scale and Proportion
Think about the size of your wall and how the art will interact with the space. Large pieces look great on expansive walls, while smaller pieces might feel lost if they aren’t paired with others. As a rule of thumb, if you have a particularly large space, go bold with oversized art. If your room is smaller, a collection of smaller works can add texture without overwhelming the space.
Creative Ways to Arrange Wall Art: Go Beyond the Basics

Now that you’ve got the basics down, let’s take things up a notch. Advanced techniques can help you get a little more creative and really make your walls stand out. Here are some fun and stylish ways to think outside the box when it comes to art placement:
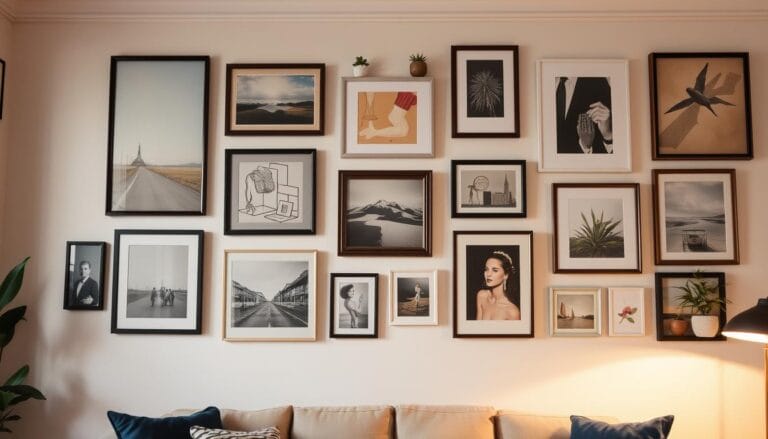
1. Gallery Walls: A Showcase of Style

A gallery wall is a bold, dynamic way to display a collection of art. Whether you’re mixing frames, photographs, prints, or even textiles, a gallery wall allows you to bring different styles and textures together into a cohesive visual experience. The trick to pulling it off is balance—think about the overall shape and flow of your wall and how the pieces interact with each other. You can keep things organized with consistent framing or vary the look for a more eclectic vibe.
2. Layering Art for Depth
Layering artwork is an unexpected yet stunning way to add depth to your walls. This technique works particularly well with smaller pieces, where you can stack artworks or overlap them slightly for an intriguing, textured look. This works best in spaces where a relaxed, artistic atmosphere is the goal—like a studio, reading nook, or even a bedroom. Just be careful not to crowd the pieces too much, as the layering should still feel intentional.
3. The Unexpected Display: Think Outside the Frame
Art doesn’t always have to be framed in the traditional sense. Try hanging artwork on unconventional supports like a vintage ladder, clipboard, or even a string with clothespins. This can introduce an element of surprise and make the arrangement feel more dynamic and fun. This method is perfect if you’re decorating a more casual space like a living room or home office, where you want to create a laid-back, personalized feel.
4. Creating Focal Points with Bold, Singular Pieces
Sometimes less is more. While gallery walls are popular, there’s something powerful about placing a single, oversized piece of art on a wall to create a focal point. This works especially well in spaces like above a couch or in a hallway. To make the piece truly stand out, ensure it’s the star of the show by keeping the surrounding area minimal. If you opt for this technique, consider going for bold, larger-than-life art that commands attention and speaks to the room’s style.
How to Choose Wall Art That Complements Your Space
Selecting the right wall art can feel like a challenge, especially when you want it to harmonize with your existing decor. But choosing the right pieces doesn’t have to be intimidating—it’s all about considering your space, your style, and the mood you want to create. Here’s how to pick art that works perfectly with your room:
1. Match Your Art to Your Room’s Personality

Before you pick a piece, think about the overall personality of the room. Is it bright and airy, with soft pastels and light fabrics? If so, abstract art with gentle, flowing lines or minimalistic pieces might be your best bet. On the other hand, a room with deep, rich colors could be the perfect backdrop for bold, geometric prints or black-and-white photography. Art should blend into the vibe of the room while still standing out as a visual focal point.
2. Coordinate Colors for Harmony
Color is one of the most impactful ways to ensure your artwork fits seamlessly into your space. Try picking out art that incorporates hues already present in your room—whether it’s the color of your throw pillows, the rug, or even the walls themselves. That way, the art feels like a natural extension of the room. However, don’t be afraid to mix things up with an unexpected color splash if you want to create contrast or draw attention to a particular area.
3. Size Matters: Scale Your Art to Fit the Wall
The size of your artwork can completely change how a room feels. Large-scale pieces make a statement and can dominate a room, making them perfect for larger walls or open spaces. Smaller artworks work best in more intimate areas or when grouped together in a gallery-style arrangement. As a rule of thumb, your artwork should cover about 60–75% of the wall it’s on. This creates a balanced proportion and makes the space feel thoughtfully designed.
4. The Power of Style: Find Art That Speaks to You
Finally, remember that the art you choose should reflect your taste. Don’t feel pressured to follow trends—art is deeply personal, and it should evoke emotion or tell a story. Whether you’re drawn to abstract pieces, vintage photography, modern pop art, or serene landscapes, go with what resonates with you. A space should feel authentic, and your art is the best way to inject your personality into the room.
The Essential Tools for Hanging Your Wall Art Like a Pro

Now that you’ve got a clear vision of how to arrange your wall art, let’s talk about the tools that will make the job easier—and safer. No one wants to end up with crooked art or, worse, a damaged wall. Here are the essential tools you’ll need to set up your art in the best possible way:
1. Measuring Tape: Precision is Key
One of the most common mistakes when hanging art is simply eyeballing it. A measuring tape is your best friend to ensure that your art is hung at the right height and positioned evenly on the wall. Measuring out equal spaces between pieces in a gallery wall or ensuring a singular piece is centered can save you time and frustration in the long run.
2. Level: Keep Your Art Straight
A level is an absolute must. Even a slight tilt can throw off the aesthetic of your entire arrangement. Whether you’re hanging a single frame or a full gallery wall, using a level will ensure everything is perfectly straight. It only takes a few seconds, but it can make all the difference in the overall polish of the look.
3. Picture Hanging Hardware: Choose Wisely
Choosing the right hardware for your art is essential to make sure it stays securely on the wall. For heavier pieces, make sure to use wall anchors, screws, or a picture-hanging wire. For lighter pieces, adhesive strips or small nails might suffice. Always consider the weight of the art and the type of wall you’re working with (drywall, brick, etc.) when picking your hardware.
4. Pencil: Mark Your Spots
Before you make any holes in the wall, lightly mark the spots where you want your hooks or nails to go with a pencil. This allows you to adjust the placement without making unnecessary holes or creating a mess. Just be sure to use a pencil that can be easily erased later—there’s nothing worse than leaving visible marks on the wall after all your hard work.
5. Stepladder: For High Walls
If you’re hanging art on a high wall, a sturdy step ladder is key. No one wants to risk balancing on a chair or reaching awkwardly for that perfect spot. A stepladder will help you reach new heights safely, ensuring you can hang your art at the perfect level without strain.
Avoid These Common Mistakes to Perfect Your Wall Art Arrangement
Even the most seasoned decorators can fall into a few common traps when arranging wall art. It’s easy to make a mistake that can throw off the balance of a room, but with a little awareness, these pitfalls are easy to avoid. Here’s what to watch out for:
1. Hanging Art Too High (or Too Low)
It’s a classic mistake: hanging art too high on the wall. It may seem like you’re giving the piece room to breathe, but artwork positioned too high can create an awkward, disconnected feel. The sweet spot? Aim to have the center of your artwork at eye level (around 57-60 inches from the floor). This ensures that the art is easy to appreciate and doesn’t look like it’s floating above the room. If you’re hanging multiple pieces, aim for consistency.
2. Ignoring the Scale of the Wall
While it’s tempting to go for smaller art pieces to fill a space, you could end up with a room that feels incomplete. On larger walls, smaller art can look lost, leaving the space feeling underwhelming. Similarly, over-sized art in a small room can overwhelm the space. The key is to scale your art to fit the wall, or group smaller pieces together to create a more impactful presence.
3. Overcrowding the Wall
We get it, it’s hard to choose just a few pieces when you have so many great options! But overcrowding your wall can make the space feel cluttered rather than curated. If you’re doing a gallery wall, try to give each piece room to breathe. A little negative space can make all the difference in how your arrangement feels—don’t be afraid to let some areas stay empty.
4. Forgetting the Room’s Flow and Purpose
Don’t forget that your wall art should support the flow and purpose of the room. In a space meant for relaxation, like a bedroom or living room, avoid overly chaotic or jarring artwork that disrupts the calm. In contrast, a vibrant, energetic piece might be perfect in a home office or kitchen, where activity and creativity thrive. Think about the overall vibe of the room and choose art that complements it.
5. Not Using Proper Hanging Tools
It’s tempting to use whatever’s lying around to hang your artwork, but trust us—using the right tools is crucial. Make sure you’re using the proper hardware for your wall type and the weight of your art. For heavier pieces, avoid the small nails and reach for wall anchors or screws. Not only will this ensure the safety of your art, but it will also keep it secure for years to come.
Common Questions About Wall Art Arrangement
How do I arrange art if I have limited wall space?
When working with limited wall space, focus on smaller pieces or a single statement piece that can stand on its own. If you’re creating a gallery wall, choose a few smaller works and arrange them in a compact cluster to make the most of the space. Vertical arrangements can also help maximize shorter walls, making them appear taller and more dynamic.
What’s the best way to arrange art above a couch?
Above a couch, artwork should be roughly two-thirds of the width of the couch to create a balanced look. If the piece is too small, it might feel disconnected from the furniture. For a more relaxed feel, place the artwork 6-8 inches above the back of the couch. If you’re using multiple pieces, ensure they’re grouped in a way that feels cohesive—whether that’s in a grid pattern or a more organic layout.
Can I mix different art styles in one room?
Absolutely! Mixing different art styles can add personality and variety to your space. The key is to find a common thread—whether that’s a color scheme, the mood of the artwork, or even the framing style. As long as there’s some sense of harmony in the combination, your room will feel eclectic and inviting rather than chaotic. For instance, pairing a modern piece with a vintage photograph can be stunning if the colors or themes connect.
How do I make my art collection feel cohesive?
To make an art collection feel cohesive, focus on a few unifying elements. This could be a consistent color palette, similar framing styles, or a common theme throughout the artwork. If your pieces are all over the place in style, a consistent frame color (like black or gold) can tie them together visually. Additionally, placing the art in a balanced layout (evenly spaced and aligned) can also help unify the pieces
Final Thoughts on Arranging Wall Art to Elevate Your Space
Arranging wall art is more than just a decorative task it’s an opportunity to reflect your personal style, enhance the vibe of a room, and create a space that feels truly yours. Whether you’re just starting out with a few simple pieces or you’re ready to dive into a full gallery wall, the key is to find what works best for you and your space.
Remember, there are no hard-and-fast rules. Don’t be afraid to experiment with different placements, mix and match styles, and trust your instincts. The process of arranging wall art is about creating a space that feels comfortable, balanced, and full of character. And most importantly, have fun with it!
Now that you have the tools, tips, and tricks to confidently arrange your art, it’s time to get creative. So go ahead, let your walls tell a story and transform your space into something truly special.
This concludes our guide on wall art arrangement! Feel free to experiment, trust your own taste, and enjoy the process of making your home reflect your unique style.