
How to Make a Vintage Wall Art?
Have you ever wished your walls could tell a story? Vintage wall art has the power to evoke memories, add depth, and create a sense of timelessness in any space. But the best part? You don’t need to be a professional artist to bring these stunning creations to life. Whether you’re a DIY enthusiast or someone who just wants to inject a bit of character into their home decor, learning how to make a vintage wall art is a rewarding and relatively simple process.
In this guide, we’ll walk you through the steps to create your own unique vintage masterpiece. From choosing the right materials to applying aging techniques, you’ll discover how to transform a blank canvas into a work of art that feels like it’s been passed down through generations. Plus, we’ll share tips and tricks to help you master both traditional and digital vintage styles.
Ready to get started? Let’s dive into the world of vintage art and learn how to make a piece that’s truly yours.
Table of Contents
What Makes Wall Art “Vintage”? Understanding the Aesthetic
When we think of vintage art, what comes to mind? The warmth of faded colors, the charm of weathered textures, and a sense of nostalgia that brings the past into the present. But what truly defines vintage wall art, and why has it become such a beloved style?
At its core, vintage art is more than just old it’s about capturing the essence of a particular era, whether it’s mid-century modern, retro, or even Victorian. What sets vintage pieces apart is their ability to transport you to another time, evoking memories or emotions that resonate with the viewer.
Key Characteristics of Vintage Wall Art:
- Aged Look – Whether it’s through techniques like distressing, cracking, or weathering, vintage art often incorporates a sense of age. This gives the piece character and makes it feel like it has a history, even if it’s brand new.
- Muted Color Palettes – Vintage designs tend to feature softer, faded colors instead of bright, saturated tones. Think of pastel shades, earthy hues, or faded jewel tones that evoke a sense of time worn down by years.
- Retro or Classic Imagery – Many vintage pieces incorporate imagery from past decades be it retro advertising, old movie posters, or antique portraits. These visuals instantly give a piece an air of nostalgia.
- Textural Elements – Vintage art often includes texture, whether through physical materials (such as canvas, wood, or metal) or through visual effects (like brush strokes or distressed edges). This texture adds depth and interest, making the artwork feel like a tactile piece of history.
Why Vintage Art Is So Popular Today
What’s interesting is that while vintage art originates from the past, it’s timeless both literally and figuratively. In today’s interiors, vintage pieces act as perfect contrasts to sleek, modern decor, offering a grounded, warm energy to the space. They serve as a reminder of simpler times, but they also add an element of storytelling that connects the old with the new.
Whether you’re drawn to the industrial chic of old signage, the playful nature of retro pop art, or the elegance of classic botanical prints, understanding the vintage aesthetic is the first step toward creating your own timeless art piece.
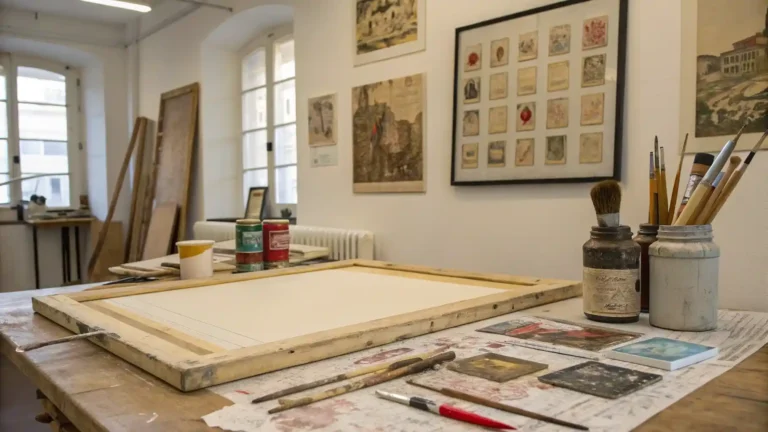
Essential Materials and Tools for Making Vintage Wall Art

Before you begin the creative journey of making your own vintage wall art, it’s essential to gather the right materials and tools. Don’t worry you don’t need a full art studio to create stunning pieces. Many of the tools you’ll need can be found at your local craft store or online, and the materials themselves can be fairly affordable. Here’s what you’ll need to get started:
Basic Materials:
- Canvas or Wood Panel – Your surface matters. For a traditional look, a stretched canvas is perfect, but you can also use wooden panels or even old reclaimed wood for a rustic, vintage vibe.
- Acrylic Paints – Acrylics are versatile, fast-drying, and perfect for layering colors to create those weathered, vintage effects. Stick to muted tones like soft browns, pastels, and faded reds to get that nostalgic look.
- Distressing Tools – To give your artwork an aged, worn look, tools like sandpaper, distressing brushes, or even steel wool will help you create scratches and textures that mimic age and use.
- Vintage Stencils – For those looking to add vintage-inspired typography or imagery, a good stencil can be a lifesaver. You can find stencils for everything from old-school fonts to intricate patterns.
- Varnish or Glaze – A varnish or matte glaze can help seal your artwork while also giving it an aged, timeworn finish. Look for a matte finish to avoid modern-looking shine, which can make the art feel less authentic.
- Ink or Dye – If you’re going for a more weathered look, using ink or fabric dye can help achieve those deep, vintage tones, especially for backgrounds or paper-based art.
Optional Materials:
- Paper for Collage – Vintage paper, such as old book pages, newspapers, or even aged tissue paper, can add texture and a historic feel to your artwork. These materials work wonderfully for collage-based vintage pieces.
- Photographs or Old Postcards – Incorporating old photographs or postcards into your piece can instantly boost the vintage appeal. These can be scanned, printed, or even used as original elements.
- Gold Leaf or Metallic Paint – If you want to add a touch of vintage luxury, consider adding gold leaf or metallic paints to accent certain areas of your art. It gives a vintage piece a bit of elegance, like something you’d find in an antique shop.
Tools for Creating the Vintage Effect:
- Brushes & Palette Knives – You’ll need a variety of brushes for creating different textures. Flat brushes are great for covering large areas, while fine brushes help you add small details. Palette knives can create interesting textures when used to scrape or spread paint.
- Spray Bottles & Sponges – For creating splatter effects or subtle aging, a spray bottle filled with water or diluted paint can be used to mist over your piece. Sponges work well for adding soft textures or distressing areas of your art.
- Digital Tools (if making digital vintage art) – If you prefer working digitally, apps like Adobe Photoshop or Procreate can help you create vintage effects by using filters, textures, and overlays. You can even combine your digital artwork with physical elements for a hybrid vintage look.
Where to Source Your Materials:
- Local Craft Stores – Stores like Michaels or Joann Fabrics carry a wide variety of supplies for creating vintage art.
- Online Retailers – Websites like Amazon or Etsy offer unique tools, stencils, and specialty materials that might be harder to find in-store.
- Thrift Stores – Old magazines, books, or prints can provide both inspiration and actual materials for your vintage art project.
With these tools and materials in hand, you’ll be ready to begin crafting your own vintage wall art. Whether you’re aiming for a distressed, weathered look or a more refined, retro aesthetic, these supplies will give you everything you need to bring your creative vision to life.
How to Make a Vintage Wall Art: Step-by-Step Instructions
Creating your own vintage wall art is a fun and fulfilling project that lets you inject personality and history into your living space. Whether you’re aiming for a retro pop-art poster or a distressed, antique-looking painting, the process can be incredibly rewarding. Here’s how you can craft your own vintage masterpiece from start to finish.
Step 1: Choose Your Style
The first step is deciding what kind of vintage look you want to create. Do you prefer the clean lines of mid-century modern art, or are you drawn to the faded elegance of vintage botanical prints? Perhaps you want to combine elements from several eras to create something entirely unique. Some popular vintage styles include:
- Mid-Century Modern: Clean lines, geometric shapes, and bold colors.
- Retro Pop Art: Bright colors, graphic patterns, and playful imagery.
- Shabby Chic: Soft pastels, floral designs, and worn textures.
- Antique or Victorian: Darker hues, ornate patterns, and intricate details.
Step 2: Prepare Your Canvas
Once you’ve chosen your style, it’s time to prepare your canvas. If you’re working with a wood panel, make sure to sand it lightly to create a smooth surface. For canvas, stretch it taut over a frame if needed. Depending on your desired effect, you might want to apply a layer of gesso to prime the surface, especially if you plan on using a lot of texture.
- Tip: If you want to give your canvas a vintage feel from the start, apply a base coat of off-white or light brown acrylic paint. This serves as a “weathered” backdrop for the next layers.
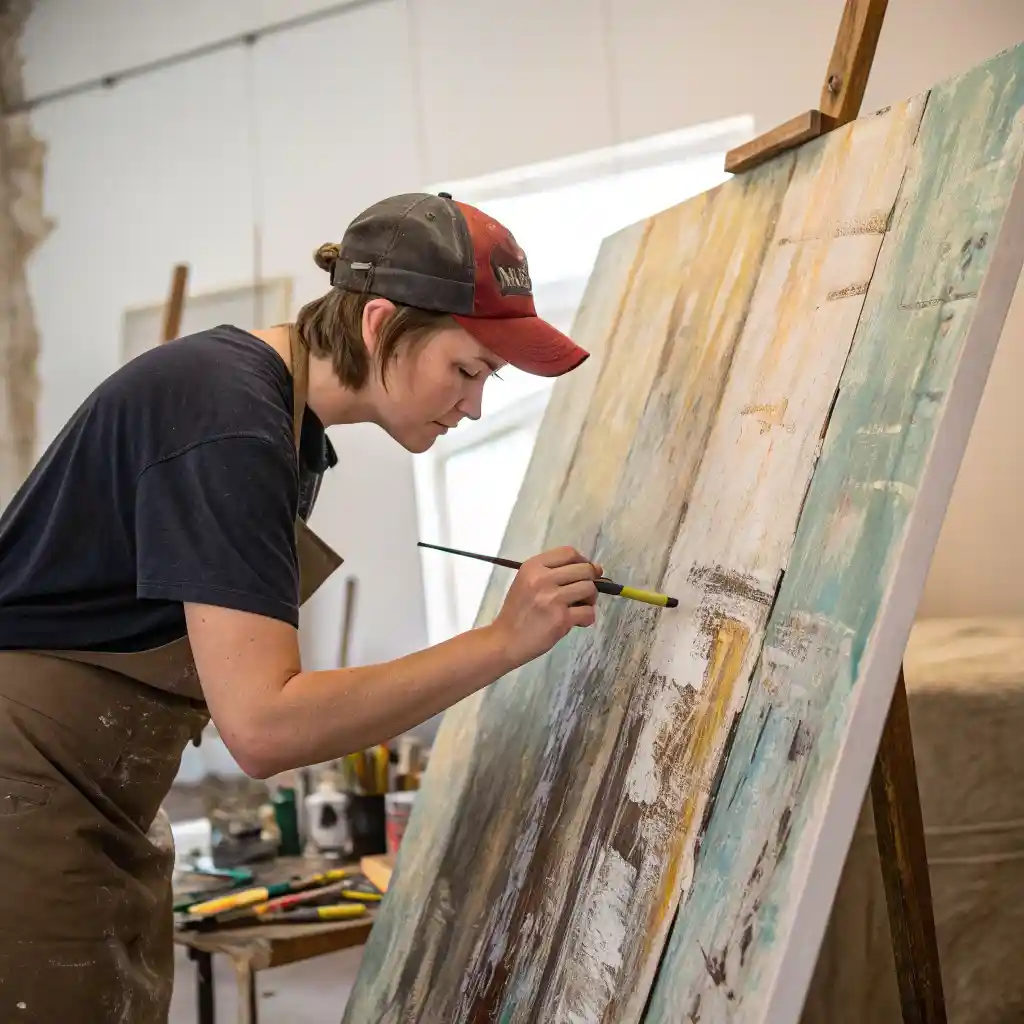
Step 3: Create Your Design
Now comes the fun part painting or applying your design. There are various ways to add a vintage feel, depending on your style. Here are a few techniques to help you achieve that aged, worn look:
- Layering: Use several layers of paint, letting each layer dry before applying the next. Choose muted, soft colors for that vintage vibe. You can also layer your designs with stencils or freehand drawing to add texture.
- Distressing: To create the look of timeworn art, sand parts of the painting after each layer dries. Gently rub the sandpaper over edges, corners, or the center of the design to reveal “wear and tear.”
- Using Stencils: If you want vintage typography or patterns, stencils are an easy way to replicate classic designs. Whether it’s a vintage ad, logo, or floral print, stencils can give your piece a more polished yet retro feel.
Step 4: Add the Finishing Touches
After your main design has dried, it’s time to add those final details that make your vintage art truly unique:
- Texture: Use a palette knife or textured brush to add depth. Apply a thick coat of paint to certain areas for a rough, impasto effect or mix in sand for a gritty, aged texture.
- Aging: To create that aged look, add a wash of brown or sepia ink over your art. This will help give the piece an antiqued appearance, especially when lightly rubbed into crevices. If you’re working digitally, filters and overlays can help add a vintage “grunge” effect.
- Final Coat: Seal your vintage art with a matte varnish or glaze. This not only protects the surface but also enhances the worn, classic look you’ve created.
Step 5: Display Your Art
Once your piece is complete and fully dried, it’s time to display your vintage creation. Whether it’s a large, statement piece in your living room or a smaller accent piece in a hallway, vintage wall art tends to stand out when paired with clean, modern furniture.
- Tip: To complete the vintage feel, consider framing your artwork with an antique or distressed frame. The right frame can really tie everything together and elevate the overall look.
Creating your own vintage wall art doesn’t have to be complicated. With a few simple materials and some creativity, you can produce art that feels like it’s been around for decades adding a personalized, nostalgic touch to any room. Now that you have the basics down, you’re ready to dive into even more advanced techniques and tips for taking your art to the next level.
Advanced Techniques to Enhance Your Vintage Art Creations
Once you’ve mastered the basics of making vintage wall art, it’s time to take your skills to the next level. Advanced techniques can add depth, complexity, and even a professional touch to your creations, allowing you to elevate your vintage pieces beyond the ordinary. Here are a few methods you can experiment with to truly transform your artwork.
1. Mixed Media Magic
Mixed media involves combining different materials to create a multi-layered effect. It’s a perfect technique for adding complexity to vintage wall art. By incorporating various elements, you can create texture, visual interest, and a deeper connection to the vintage aesthetic.
- Materials to Use: Old book pages, vintage postcards, fabric, photographs, or even found objects.
- How to Use: Apply your collage materials to the canvas using glue or mod podge. Once dry, you can paint over them to blend them into the artwork or allow them to stand out. Use varnish or glazing over the top to seal everything in place.
- Why It Works: Mixing different textures, colors, and materials mimics the eclectic nature of vintage art, giving your piece a sense of history and storytelling.
2. Experimenting with Digital Vintage Art
If you’re tech-savvy, you can use digital tools to create vintage-style artwork. Digital art offers endless possibilities, allowing you to combine modern convenience with classic design.
- Tools to Use: Adobe Photoshop, Illustrator, or apps like Procreate for tablet users.
- How to Use: Start by creating your artwork digitally, using vintage-inspired fonts, textures, and filters. You can scan in old photos or use vintage illustrations as part of your design. Experiment with color saturation, adding grain or noise to give the piece an aged look.
- Why It Works: Digital vintage art gives you full control over every aspect of your piece. You can replicate the look of classic advertisements, old movie posters, or antique illustrations with precision. Once you’re happy with the result, you can print it on high-quality paper or canvas for a physical piece.
3. Adding Layers of Texture
One of the most beautiful aspects of vintage art is its tactile quality. The more texture you can add, the more it will evoke the feel of age and wear. There are several ways to introduce texture to your art:
- Texture Paste: Apply texture paste to your canvas and use a palette knife to create raised, rough surfaces. Once dry, you can paint over it to create an aged, worn look.
- Fabric or Lace: Incorporating fabric or lace into your piece adds a vintage, handmade feel. You can glue fabric to your canvas, distress it, and paint over it to create depth.
- Crackling Effects: Use crackle medium over a painted surface to create the illusion of age. When applied, this medium creates cracks in the paint, giving it an authentic vintage appearance.
4. Aging with Tea and Coffee Stains
For a truly authentic vintage effect, try using natural staining methods like tea or coffee. These techniques are a great way to give your canvas or paper a warm, aged appearance without the need for chemicals or special tools.
- How to Use: Brew a strong cup of tea or coffee and use a paintbrush or sponge to apply it to the surface of your artwork. The longer you leave the stain, the darker and more aged the effect will look. You can even mix the tea or coffee with water to control the intensity.
- Why It Works: This technique is especially useful for achieving an antique, “worn-paper” effect on your vintage pieces, perfect for old maps, letters, or distressed artwork.
5. Gold Leaf and Metallic Accents
If you want to add a touch of elegance to your vintage art, consider incorporating gold leaf or metallic accents. Vintage pieces often feature subtle metallic detailing, such as gilded frames or gold lettering.
- How to Use: Apply gold leaf to select areas of your artwork to create focal points. For example, you could highlight certain elements of a design with metallic accents or outline a vintage quote in gold.
- Why It Works: Gold leaf and metallic paints give your piece a touch of luxury and refinement, taking it from basic to brilliant. They also add a timeless quality that enhances the vintage appeal.
6. Aging Photographs or Prints
If you’re working with vintage photography or prints, you can make them appear even older by introducing wear and tear. These methods can help your images blend seamlessly into your vintage artwork.
- Techniques: Burn the edges of your photo with a lighter, or distress it by lightly sanding the paper to create fraying. You can also use tea or coffee stains to give the paper a sepia tone.
- Why It Works: Adding physical distress to photographs makes them feel even more historical, adding authenticity to your piece and further enhancing the vintage aesthetic.
By incorporating these advanced techniques into your vintage wall art creations, you can elevate your DIY projects to a whole new level. These techniques add depth, texture, and character to your pieces, making them feel like they’ve been part of history rather than freshly created. Don’t be afraid to experiment and combine different techniques to achieve your desired vintage look.
Troubleshooting: Common Mistakes When Making Vintage Wall Art (And How to Fix Them)
Creating vintage wall art can be a thrilling project, but sometimes things don’t go as planned. Whether it’s a misstep with colors, textures, or techniques, don’t get discouraged these mistakes are a natural part of the creative process. Let’s explore some common pitfalls when making vintage wall art and how to troubleshoot them, so you can still end up with a piece that feels authentic and polished.
1. The Colors Are Too Bright or Too Modern
Vintage art is known for its muted, faded color palette. If you’ve used bright, vibrant hues, your artwork may not have the nostalgic feel you’re aiming for. The key to achieving that vintage look is in the tones.
- How to Fix It: If your colors are too bright, try toning them down by mixing them with a neutral, like white, brown, or grey. You can also use a dry brush technique to apply a thin wash of a neutral or earthy color over your artwork to mute overly bright shades. For an extra aged effect, add a light layer of brown or sepia glaze to give the piece a weathered look.
2. The Texture Isn’t As Aged as You Want
A big part of vintage art is the texture. Whether you’re trying to mimic cracked paint, aged wood, or worn paper, getting the texture just right can be tricky.
- How to Fix It: Use distressing tools such as sandpaper, steel wool, or a palette knife to gently scratch or rub down parts of the artwork. For cracked paint, use crackle medium to give the appearance of old, peeling layers. If you want to add more texture, try incorporating fabric, lace, or even textured paint to create a tactile surface.
3. The Art Feels Too “New”
Sometimes, even after painting and distressing, your vintage wall art might still feel too clean and fresh. You’re aiming for a piece that looks like it’s been around for decades, so don’t be afraid to embrace imperfections.
- How to Fix It: Embrace imperfection by adding more wear and tear. Consider using a tea or coffee stain to add warmth and depth to the piece, especially in the background. You can also lightly rub a soft cloth with brown ink to add darkened edges, simulating the look of aged paper. For a final touch, applying a matte varnish can dull down any unnatural shine and give your piece the muted finish that vintage art typically has.
4. The Art Feels Too Flat or Lifeless
While vintage art often has a more subdued tone, it should still have depth and dimension. If your piece feels too flat, you might be missing out on layering and texture that would give it life.
- How to Fix It: Add layers of paint or mixed media elements. For example, you can build up the surface with modeling paste, textured gel, or a thicker application of paint. Layering elements like torn paper, fabric, or vintage photographs also help to create depth and visual interest. Finally, adding subtle metallic or gold leaf accents can draw the eye and create contrast against the worn appearance of the rest of the art.
5. Distressed Elements Look Too Forced
Distressing techniques, like sanding or tearing, can sometimes result in an unnatural, overdone look if not carefully applied. If you’ve gone a bit too heavy-handed with the distressing, it may appear as though you’re trying too hard to make it look old.
- How to Fix It: Take a step back and assess the distressed areas. If they seem too harsh, lightly sand them back again or use a soft cloth to rub away some of the distressing. Aim for subtlety: vintage art should show signs of wear and aging, but it shouldn’t look artificially distressed. A good way to fix overdone distressing is to apply a very thin layer of paint over the area and lightly sand it again for a more natural, worn-in appearance.
6. Your Vintage Art Looks Too “Generic”
It’s easy to follow trends and try to replicate popular vintage styles, but your artwork might end up feeling a bit too predictable or similar to others.
- How to Fix It: Inject your personality and creativity into the design. Add personal elements, whether it’s a favorite quote, a meaningful image, or a unique texture you’ve never used before. Look for ways to combine different vintage aesthetics that feel authentic to you. Experiment with mixing eras or blending different artistic techniques. The best vintage art tells a story, and the most impactful pieces are those that reflect the creator’s unique vision.
Vintage wall art is all about trial and error, and even seasoned artists face challenges. Don’t be afraid to make mistakes each one brings you closer to perfecting your piece. By addressing these common issues and learning how to fix them, you’ll be able to create vintage artwork that looks both authentic and personal, giving your space a timeless appeal.
Where to Display Your Vintage Wall Art for Maximum Impact
Now that you’ve created your very own vintage wall art masterpiece, it’s time to think about where to showcase it. The placement of your artwork can have a huge impact on its overall effect, enhancing both the piece and the space it’s in. Whether you’ve made a bold statement piece or a more subtle vintage accent, strategic placement will ensure it’s seen and appreciated.
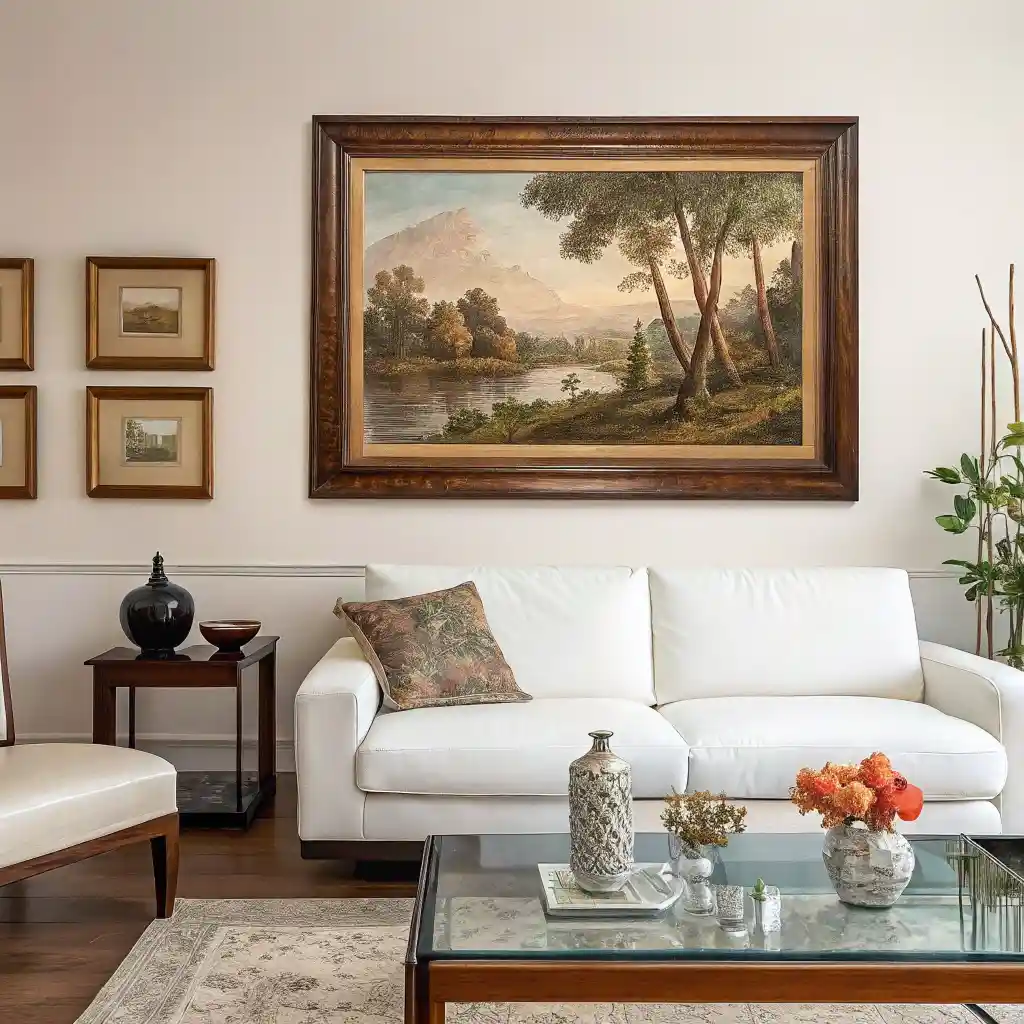
1. Living Room: Make a Bold Statement
The living room is the heart of the home, making it a perfect place to display your vintage wall art. Whether it’s above the couch, on a feature wall, or leaning against a bookshelf, vintage pieces add character and charm to this central space.
- Tip: Create a focal point by placing a large vintage art piece above the sofa. This works especially well with larger pieces or those that combine multiple styles, as it draws the eye in. If your art has muted, vintage colors, it can also balance out more modern, minimalist furniture.
2. Bedroom: Add a Touch of Nostalgia
Your bedroom is a personal space, so why not infuse it with a bit of nostalgia and warmth? Vintage art here can evoke a sense of serenity and timeless beauty, making it the perfect room for your creation.
- Tip: Hang vintage art pieces near your bed, on either side of the headboard, or above the bedframe. If you want to create a calming atmosphere, opt for soft, muted vintage styles, such as vintage floral prints or abstract mid-century designs. These work well to complement the cozy and restful nature of a bedroom.
3. Dining Room: Create a Warm, Inviting Ambience
A vintage piece in the dining room can set the tone for a warm, welcoming atmosphere. Vintage art often works well with wood or rustic furniture, bringing warmth and character to an otherwise simple space.
- Tip: Hang your artwork on the wall opposite your dining table, or above a buffet or sideboard to create balance and visual interest. This can turn your dining area into a nostalgic gathering space, perfect for both everyday meals and special occasions.
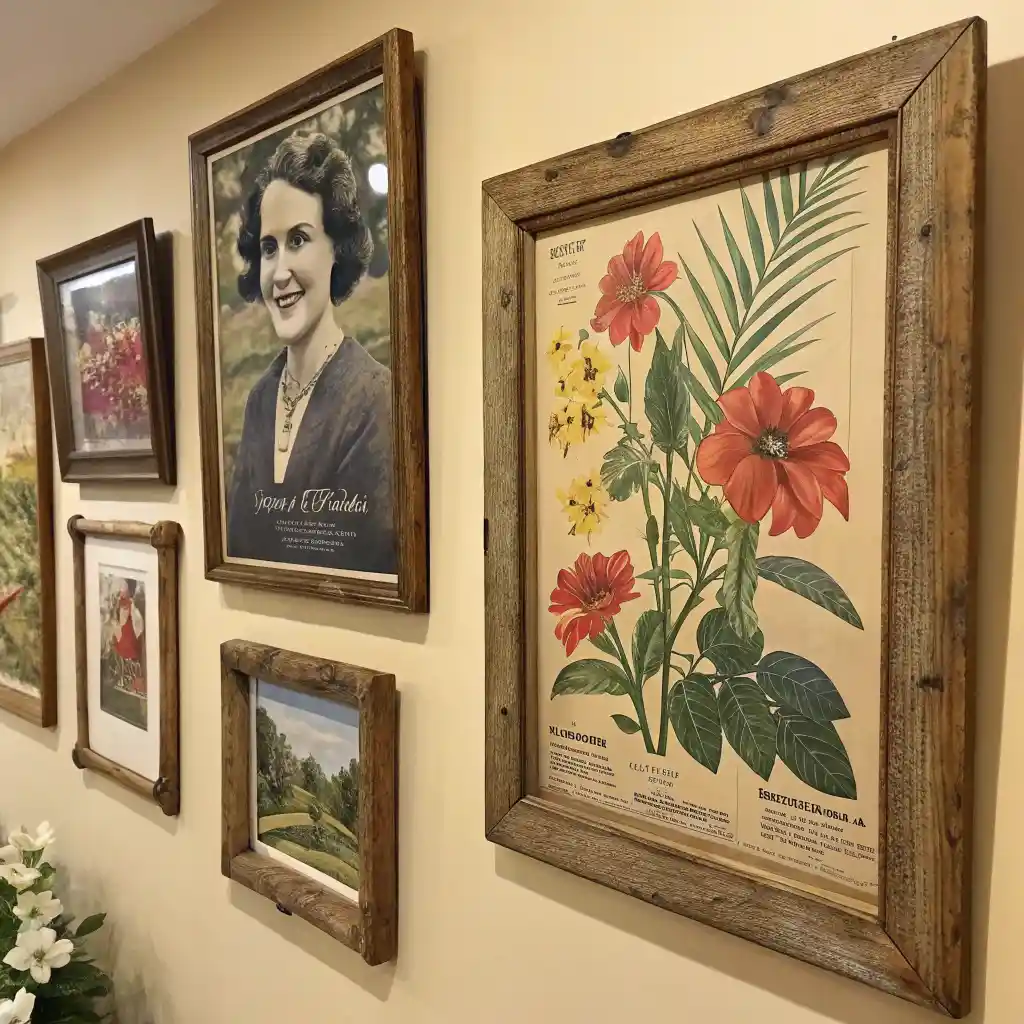
4. Hallways & Entryways: Showcase Smaller, Subtle Pieces
Hallways and entryways are often underutilized spaces in home decor, but they offer a perfect opportunity to display smaller vintage pieces. They can set the tone for the rest of the house and greet guests with your unique sense of style.
- Tip: Opt for a series of smaller vintage prints or photographs in these spaces to create a gallery-style wall. Try mixing different vintage styles to give the hallway personality. A well-placed vintage map or travel poster can also add a nostalgic touch to an entryway, offering guests a preview of the vintage style that awaits inside.
5. Office or Study: Inject Creativity and Inspiration
If you work from home or have a personal study, displaying vintage art can provide inspiration and set a creative tone for your workspace. Vintage art can create an environment that is both productive and aesthetically inspiring.
- Tip: Hang vintage art in areas that are visible from your desk or work area. Pieces that feature vintage typography, travel posters, or old-school illustrations can add a sense of history and inspiration to your space, making it a more stimulating environment to work in.
6. Kitchen: Add Whimsy and Charm
While vintage art isn’t typically the first thing people think of when designing a kitchen, a well-chosen piece can add warmth, humor, and charm to this often overlooked space. A vintage advertisement, retro diner signage, or old-fashioned botanical prints can work wonderfully in a kitchen.
- Tip: Consider placing vintage art above kitchen shelves or next to the dining nook. A vintage food poster or recipe print can also tie in with the theme of cooking and dining, adding a quirky and personal touch.
Final Tip for Displaying Your Vintage Art:
No matter where you choose to display your vintage art, the key is to allow it to become part of the room’s overall aesthetic. If your home is filled with modern, minimalist furniture, a large vintage art piece will stand out, offering contrast and visual interest. Alternatively, in a space filled with other vintage or antique decor, smaller art pieces can complement the overall theme and add depth to the room.
Remember, placement isn’t just about filling a space it’s about creating a mood. Vintage art has the power to transport you to another time and place, so choose the spot where it will truly shine and help tell the story of your home.
Inspirations for Your Vintage Wall Art Projects
One of the most exciting aspects of creating your own vintage wall art is the endless possibilities for inspiration. Vintage art is not only about replicating the past; it’s about infusing personal style with timeless appeal. Whether you’re starting from scratch or just looking for ideas to spark your creativity, here are a few sources of inspiration to help guide your project.
1. Old Travel Posters: Nostalgia for Adventure
Vintage travel posters are iconic in the world of art, offering a sense of nostalgia for adventure, exploration, and a simpler time. Think of those brightly colored advertisements for places like Paris, New York, or tropical destinations the kind you’d see on the walls of mid-century hotels or in vintage train stations.
- How to Use: Recreate a classic travel poster or adapt the style to your favorite destinations. You could incorporate your own photos of memorable trips or use bold typography to mimic the style of old-fashioned advertisements. For a more personal touch, customize the design with a quote or phrase that holds meaning for you.
2. Retro Advertisements: Vintage Charm in Consumer Goods
One of the most beloved aspects of vintage art is its connection to advertisements. Old product ads whether for soda, cars, or household goods carry a whimsical charm and capture the spirit of past decades.
- How to Use: Find inspiration in old ads and create a modern interpretation using vintage typography, bright colors, and quirky logos. Recreate ads for products you love, or incorporate modern products with a vintage twist, like turning your favorite brand logo into a retro-inspired design.
3. Vintage Typography: Classic Fonts for a Timeless Appeal
Vintage typography has a unique way of capturing attention. From classic movie posters to old book covers, the fonts used in vintage designs hold a special charm. Bold, serif fonts often dominate the vintage aesthetic, creating a timeless look that draws on past graphic design trends.
- How to Use: Choose a vintage font (there are plenty of free fonts available online) and design a piece with a famous quote, phrase, or word that speaks to you. Use bold colors or black and white for contrast, and experiment with incorporating other elements like illustrations or borders.
4. Botanical Prints: A Vintage Natural Touch
Botanical prints were a staple in vintage artwork, especially in the 19th century. These nature-inspired pieces, often depicting plants and flowers with incredible detail, have a timeless appeal that never goes out of style.
- How to Use: You can either paint your own botanical prints or find inspiration in vintage plant illustrations. Think about framing a beautiful, hand-painted flower or using stencils to create delicate floral designs. For a modern take, mix in geometric shapes or minimalist elements to give the piece a fresh twist while retaining its vintage charm.
5. Antique Maps: Bringing the World to Your Walls
Maps have long been a popular element in vintage decor. Whether it’s a map of a city, country, or the world, antique maps evoke a sense of discovery, adventure, and history. Old nautical charts and topographic maps have a distinct look, often marked by intricate lines and faded tones.
- How to Use: You can replicate an antique map by carefully aging the paper with coffee or tea staining, or even use digital design tools to create a more modern version with an antique twist. For an added personal touch, mark places that are meaningful to you or reflect your own travel journey.
6. Retro Patterns: Geometric and Psychedelic Designs
If you’re drawn to bold designs and vibrant colors, retro patterns from the 60s and 70s might be the perfect inspiration for your vintage art. From funky geometric shapes to psychedelic swirls, these patterns are fun, vibrant, and a true reflection of their era.
- How to Use: Incorporate bold, angular shapes and playful patterns into your artwork. Use bright, contrasting colors like mustard yellow, teal, or burnt orange for that quintessential retro look. You can even experiment with combining these patterns with more subdued, vintage elements, creating an eclectic blend of styles.
7. Vintage Photography: Capturing Moments from the Past
Vintage photography is a beautiful source of inspiration for art. Old black-and-white or sepia-toned photographs have a deep emotional resonance and often reflect a simpler, nostalgic time.
- How to Use: Scan old family photos or find vintage images from online archives. You can make these images your own by adding textures or altering colors, turning them into a work of art. Frame these photographs or even incorporate them into mixed-media pieces with painting or digital manipulation for a modern yet vintage look.
8. Collage Art: Layering the Past with the Present
Collage art allows you to combine various vintage elements, from old newspapers and postcards to vintage fabric and photographs. By layering different materials, you can create a unique piece that feels both historical and personal.
- How to Use: Gather vintage materials magazine clippings, postcards, old book pages and arrange them to form a design. Play with layering and overlapping elements to create depth. The combination of old and new elements makes collage art perfect for vintage pieces that tell a story or evoke a memory.
Mix and Match Your Inspirations
The beauty of vintage wall art is that there are no strict rules feel free to mix and match different styles and eras. Try combining retro typography with botanical prints, or use a vintage travel poster style to create a piece that’s both nostalgic and personal. Ultimately, your vintage wall art should reflect your personality and tastes while incorporating elements of the past.
Let these inspirations be the starting point for your creative process. The possibilities are endless, and every piece will be uniquely yours.
Frequently Asked Questions (FAQ)
Creating vintage wall art is a fun and rewarding project, but it’s common to have questions along the way. Here are answers to some of the most frequently asked questions to help guide you as you work on your vintage masterpiece.
1. What materials do I need to make vintage wall art?
To create vintage wall art, you’ll need a few basic materials:
-A canvas or wood panel for your base
-Acrylic paints in muted, vintage colors
-Distressing tools like sandpaper or steel wool
-Vintage stencils or stamps for added design elements
-A varnish or glaze to seal and age the piece
-Optional materials include vintage papers, old photos, or fabric for collage elements, and gold leaf or metallic accents for a touch of elegance.
2. How can I make digital designs look vintage?
Making digital art look vintage is all about applying the right filters and textures:
-Use photo editing software like Photoshop or Procreate to apply grain, noise, or sepia tones to your digital artwork.
-Experiment with vintage textures like old paper, fabric, or distressed brush strokes.
-Apply faded, muted colors to mimic the soft tones of vintage art.
-Consider using vintage typography or old-fashioned illustrations to give your design an authentic retro feel.
3. Can I make vintage art with recycled materials?
Absolutely! Vintage art can often look even more unique when made with recycled or repurposed materials. Try using old newspapers, discarded books, vintage postcards, or fabric scraps for a truly eco-friendly approach. These materials not only add authenticity but also give your artwork a personalized, historical touch.
4. What’s the best way to age my artwork?
Aging your artwork is all about creating the appearance of time. Here are some effective techniques:
-Use sandpaper to distress the paint and create a worn, weathered texture.
-Apply a tea or coffee stain to the surface of the art to mimic the look of aged paper.
-Use a crackle medium to create the effect of peeling paint.
-Rub a light layer of brown or sepia ink into the piece to give it an antique, faded look.
These methods help your art look like it’s been around for decades, adding that vintage charm.
5. How do I prevent my vintage art from looking too artificial?
One of the challenges of creating vintage art is making sure it looks naturally aged rather than artificially distressed. Here’s how to avoid that:
-Don’t overdo the distressing the best vintage art has subtle, natural-looking wear and tear.
-Let the colors naturally fade by using glazes or washes instead of harsh, quick-drying paints.
-Avoid perfect, smooth lines; embrace imperfection and irregularity, which is often found in vintage designs.
-When working with digital designs, avoid over-filtering or over-styling; keep it simple and aim for a soft, organic vintage feel.
6. Can I mix different vintage styles?
Yes! In fact, mixing vintage styles can lead to unique and interesting results. For example, you can combine retro pop art with Victorian floral patterns or blend mid-century modern elements with vintage typography. The key is to ensure that the colors and textures flow together, creating a cohesive piece while allowing for creative experimentation.
7. How do I display my vintage wall art?
Displaying your vintage art is all about balance and context:
-In the living room, hang large pieces above a sofa or make a gallery wall with smaller works.
-In a bedroom, try placing vintage art near the bed or on a statement wall to create a relaxed, nostalgic atmosphere.
-For a hallway or entryway, smaller pieces or a collage-style installation can give your guests a glimpse of your personal taste.
-Make sure to frame your art in a way that complements the vintage look weathered or antique frames work beautifully with vintage art.
Conclusion: Unleash Your Creativity with Vintage Wall Art
Creating vintage wall art isn’t just about decorating your space it’s about expressing your creativity, evoking a sense of nostalgia, and making a personal connection with your surroundings. Whether you’re a seasoned artist or a DIY beginner, the process of making vintage art is a journey that combines creativity, history, and craftsmanship.
As we’ve explored throughout this guide, making vintage wall art is about more than just using old materials; it’s about infusing your personal style with a timeless aesthetic. From choosing the right materials and tools to experimenting with advanced techniques, there are countless ways to make each piece uniquely yours. And don’t forget mistakes are part of the process. They often lead to the most beautiful and unexpected results.
So, whether you’re creating your own retro pop art, crafting distressed vintage typography, or designing a charming botanical print, the possibilities are endless. Vintage wall art can transform any room, adding character, depth, and a story to tell. The only limit is your imagination.
Now that you have the tools and inspiration, it’s time to roll up your sleeves and start crafting your own vintage masterpieces. Your walls are waiting!
Thank you for following this guide happy creating!